Tuesday, October 20, 2009

Rob's Fuel Injectors


Rob's multi-media piece that's been installed in the downstairs hallway has provided some engaging and provocative discussions regarding content, form, and the conceptual associations of the viewer.  As one person commented, "It's a very smart piece." It's great having some smart art around. I'm not sure how much longer he intends to leave it in place, but if you haven't had the chance to look and think about it, please do so.  The concept of multiples is especially strong, and the combination of paint and silkscreened text add some pretty interesting layers of meaning.  

Wednesday, October 7, 2009

RELIEF PRINTING

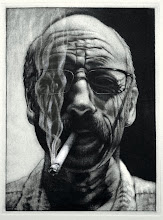
The above relief print by Andy English is part of the portfolio, Walking on Water, that was organized by the print artist Debra Fisher. Although I am not sure if this is a linoleum or wood engraving, clearly the success of the image is the result of careful planning and superb drawing skills, and utilizing the graphic potential of black and white. 


Look back at Thursday, August 28, 2008 for a short video on relief printing. Linoleum and wood are the most common surfaces for relief printing, and for those of you who are considering wood, pine and poplar are perhaps the easiest to work with, although the grain of Pine if very hard to very soft and it's sometimes very easy to see cuts that have run away.  Be careful cutting into that surface. Poplar is more medium soft and the grain more even than Pine, and it'll hold detail better. Cherry and Pear are very hard and excellent for detail work with fine lines. One of the advantages of wood over linoleum is its ability to be embossed, such as placing a metal washer on the wood surface and tapping it into the wood to create circular shapes. Because of the flexibility of linoleum, such techniques are not as successful

If your idea for the Reconciliation Portfolio has a strong graphic quality, then a relief print may be your surface of choice. What do I mean by strong graphic quality? The ability to communicate your idea through Black and White and the range of optical grays that are the result of careful cutting.

Monday, October 5, 2009

Solar Plates

Rob did a thorough presentation of solar plate today, but with five missing in action, this is a recap (of sorts).

What is solar plate?: It's a light sensitized steel backed polymer material, that is exposed with U.V light such as the sun (solar, get it?) and developed with tap water.

How is it done?:  You can work directly on the plate with opaque materials in the form of non-water based pigments, or by exposing the plate through transparent film with artwork on it. The film may be created by drawing on acetate, photocopying or scanning and printing on film, or darkroom and/or photoshop techniques. A positive transparency is for printing an intaglio, a negative transparency is for printing a relief.

What etches the plate?: Water dissolves the unexposed portions of the plate.  Either in large bold areas or tonal ranges.

The artwork is prepared with a variety of materials, such as opaque liquids, drawing devices such as lithographic pencils and crayons, spray paint, etc.  It can be created by hand drawing, computer printout, of photographic methods.  Non-water based materials if working directly on the plate.  The images are created on transparent acetate or mylar. That transparency is used as a contact positive or negative.

The exposure has been set on the light table or exposure unit in the back of the studio for 20 seconds on the aquatint screen and 35 seconds on the transparency. Even though the plates can be exposed by sunlight, exposure units are preferred my most artists. The repeatable U.V. exposure offers consistency and reliability. The aquatint screen provides an continuous tone to the surface of the plate, while the transparency that contains the art work provides the image. The two together will create an image with full tonal or value range.  With solar plate you have to expose the aquatint screen not only for tonal range, but also for additional hardening in the open areas.

The creation of an image on translucent or semi transparent film are considered positive images. If, as Rob suggests, you use a digital positive instead of a hand drawn image, you can skip the screen, but you may end up with some "foul biting" unless you play with the positive some. If you use a digital positive, 'curve' the tones in photoshop so the darkest tone is no greater than 70% black and print it on your transparency  as a random dot bitmap.

Rob will print the plate on Wednesday and we'll recap further once someone is ready to expose!

Thursday, October 1, 2009

Plate's States and other areas.

The images below were selected for posting as they have utilized all of the processes we've explored to date. Intaglio is a tremendously versatile medium once the flexibility of its theories are explored and considered. Putting an acid resistant material on the surface of a metal plate and submerging it into acid can create all kinds of challenging effects. What are some acid resistant materials? We know asphaltum works, and soft ground, which is essentially a modified version of asphaltum that has a small dose of Vaseline. Other things that resist acid include crayons, sharpies, china markers, litho pencils, spray paint.... think about the fact that our acid solution is water-based, and then think about the things that don't mix with or dissolve in water.  Think of the possibilities.  


Shawn's proof has a lot of movement around the central face that explores line, value, and texture, and given the face has such importance in the image, some kind of drastic process might be worthy of consideration, such as sand blasting the plate to a mezzotint surface and pushing a tonal layer on top of the etched layers by careful scraping and burnishing.


Hayley's proof has a strong graphic quality that may do some interesting things when combined with chine colle. Sounds like a demo....


Chris's proof is developing some deep values and subtle imagery obfuscated by those deep values. Maybe some careful burnishing would help while maintaining the spontaneity of the image.


Beth's plate has lots of levels, values, and textures that may print beautifully as a color separation.  It may also be an interesting approach to actually cut into the plate edges to bring out some of the geometry.

 
Adrienne's proof  has some subtle soft ground passages and an effective progressive aquatint that she's now scraping and burnishing into, so that the value transitions are not so abrupt (a result of progressive aquatints). This image may also benefit from an application of Chine Colle.


We're moving further into the intaglio process and many of you have been able to get through our current state.  The Labor Day Holiday, the water main break a week ago, my absence on Monday have set us back a little, but I think the progress is pretty close to where we want to be.  Next week will be pretty full with Rob's Solar Plate demonstration, relief print demo, and some introductory color printing techniques.

Our intaglio plates have presented a wide variety of images, some suited to the process and some not so much so, but this first plate was to get experienced with many of the issues that present themselves in the course of etching and printing a metal plate.  Some of the many examples are presented above.  Each of these have gone through line etch, aquatint, and soft ground.  Beth also explored open bite to some extent, and many have utilized scraping and burnishing. A few of the plates have enough levels within the plate that they'll be good candidates for some color experimentations.